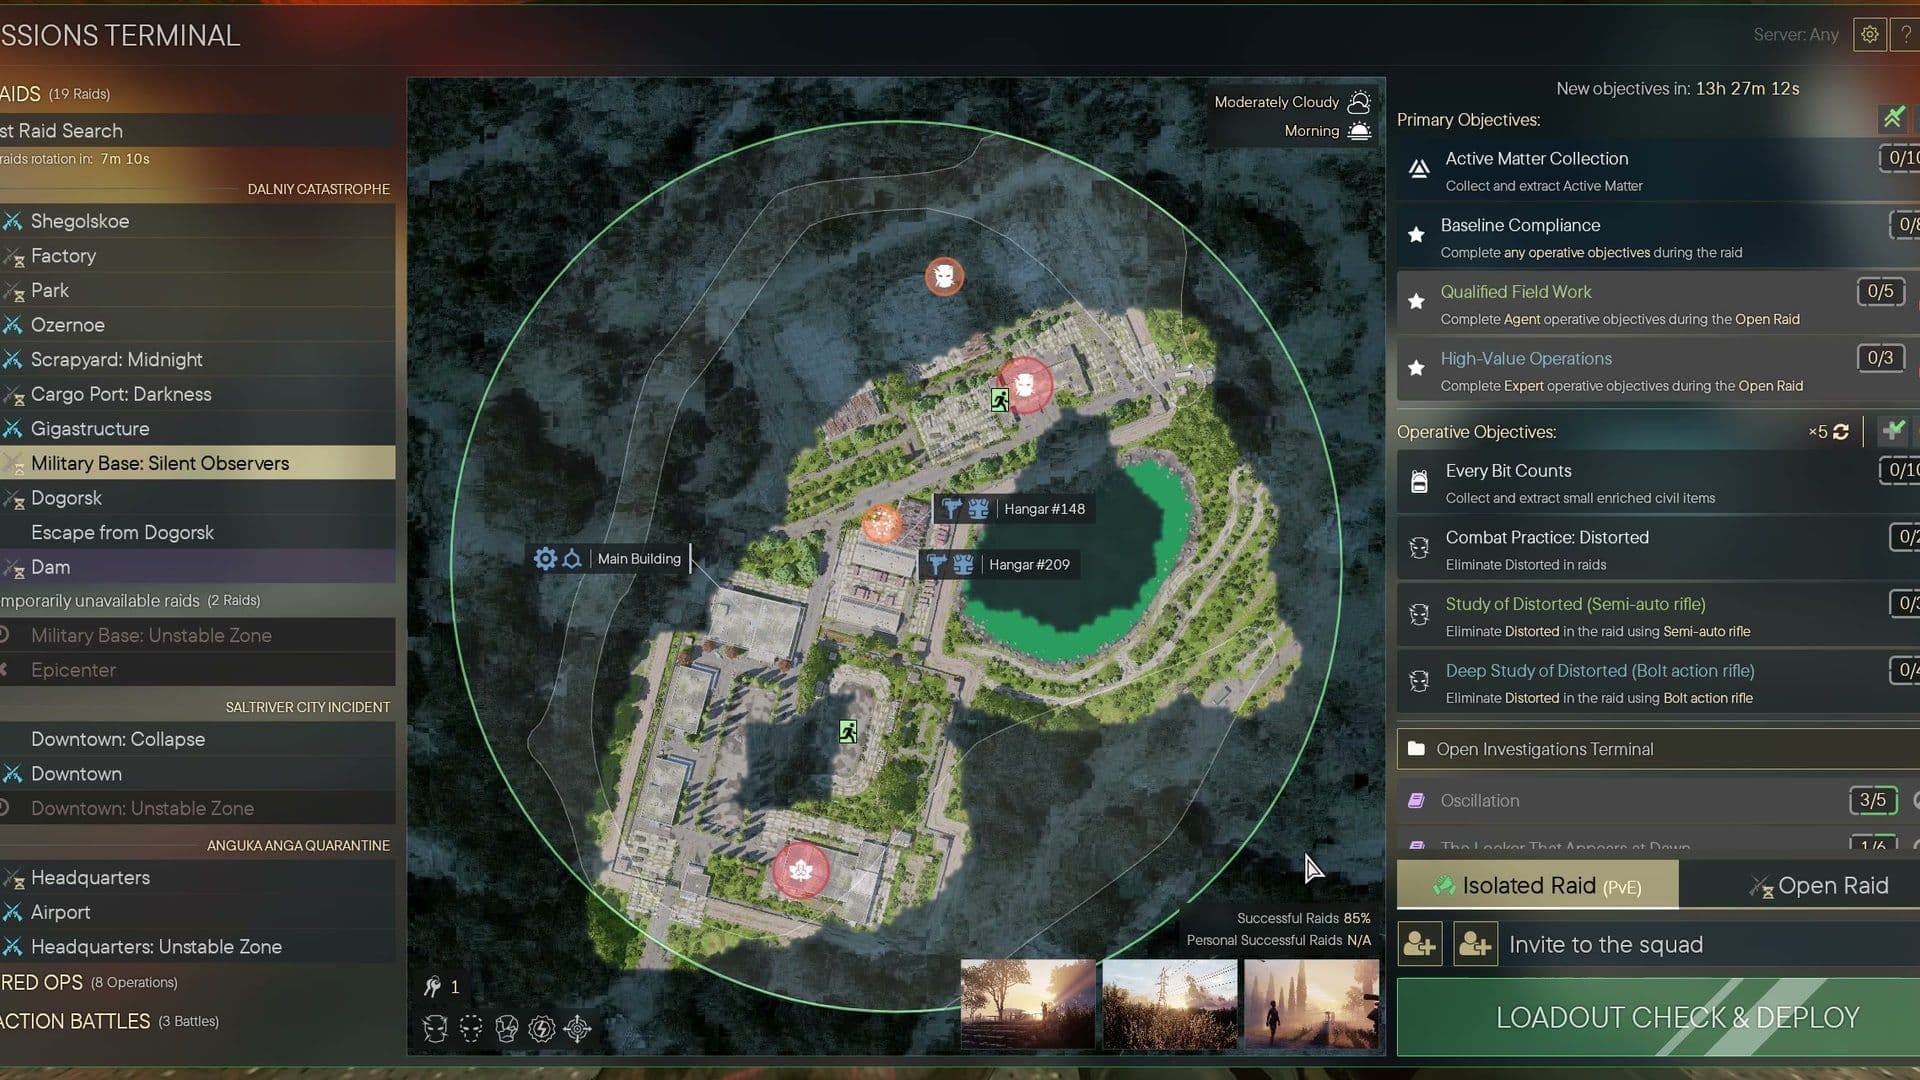
Active Matter's Missions Terminal lists nineteen raids across three regions. This guide goes through every one of them: which modes it runs in, what it asks of you, how often squads get out alive, and what each variant changes.
It's written from the game, not the wiki. Screens are from build 0.4.0.148, 25 September 2026.
Three things the terminal doesn't explain
Three things on the Missions Terminal are easy to miss, even if you've played since launch.
- You can pick an Isolated raid's variant. For raids that have variants, a Raid variant selector sits under the squad buttons. It defaults to Random; set it to Shegolskoe: Distortion or Factory: Hive and that's the version you deploy into.
- Open raids run on a schedule. The line above the weather shows the raid's clock. An hourglass means the Open raid is live, with the time it has left; a circular arrow means it's closed, and when it comes back. While it's closed, the deploy button reads RAID, Temporarily unavailable with the countdown. On the raid list, crossed swords with a small hourglass beside them mark an Open raid that's off schedule right now.
- "Temporarily unavailable raids" has a definition. Hover the heading and the game says it means "Closed by schedule, locked behind requirements, or coming later."
Reading a raid before you deploy
Every raid shows you the same things. Read them every time.
- The map. Extraction points are the green running figure, creature icons show what the zone throws at you and where, and named landmarks (Hangar #148, Cinema "Sputnik", The Cobble Hill Inn) are labelled.
- Successful Raids, bottom right of the map: the game's overall extraction rate for that raid in the mode you've selected (not your personal one, which is the line below it). The Isolated and Open numbers are different, often very different, so toggle both.
- Weather and time of day, top right, each with a countdown to the next change.
- Primary Objectives: the raid's own task (collect Active Matter, place a device, take a photo) plus the daily Baseline Compliance, Qualified Field Work and High-Value Operations tiers. The last two only count in Open raids.
- Operative Objectives: a rotating set of five, such as Combat Practice: Distorted or Soil Samples.
- Matchmaking mode: Any or Squad only, with the Auto-fill squad toggle beside it.
The mode icons
On the raid list, a leaf is Isolated (PvE) and crossed swords are Open.
- Isolated only: Escape from Dogorsk and Downtown: Collapse. Their Open button reads "Only Available as Isolated".
- Open only: Scrapyard: Midnight, Gigastructure and all three Unstable Zones. Their Isolated button reads "Not Available as Isolated".
- Everything else has both.
Every raid at a glance
Extraction rates as the terminal showed them on the morning of 25 September. They move throughout the day, so read them as a ranking, not a promise.
| Raid | Region | Isolated | Open | Variants |
|---|---|---|---|---|
| Shegolskoe | Dalniy Catastrophe | 76% | 36% | Distortion, Overgrowth |
| Factory | Dalniy Catastrophe | 82% | 36% | Hive |
| Park | Dalniy Catastrophe | 82% | 52% | |
| Ozernoe | Dalniy Catastrophe | 76% | 30% | Overgrowth |
| Scrapyard: Midnight | Dalniy Catastrophe | Not available | 37% | |
| Cargo Port | Dalniy Catastrophe | 74 to 76% | Darkness | |
| Gigastructure | Dalniy Catastrophe | Not available | 50% | |
| Military Base: Silent Observers | Dalniy Catastrophe | 85% | 43% | |
| Military Base: Unstable Zone | Dalniy Catastrophe | Not available | 16% | |
| Dogorsk | Dalniy Catastrophe | 36% | ||
| Escape from Dogorsk | Dalniy Catastrophe | 11% | Not available | |
| Dam | Dalniy Catastrophe | 53% | ||
| Epicenter | Dalniy Catastrophe | Not yet playable | Not yet playable | |
| Downtown | Saltriver City Incident | 68% | ||
| Downtown: Collapse | Saltriver City Incident | 3% | Not available | |
| Downtown: Unstable Zone | Saltriver City Incident | Not available | 62% | |
| Headquarters | Anguka Anga Quarantine | 66% | ||
| Airport | Anguka Anga Quarantine | 76% | 43% | |
| Headquarters: Unstable Zone | Anguka Anga Quarantine | Not available | 24% |
A blank cell means the mode exists but we didn't catch its number.
The pattern is the point: Open roughly halves your odds on the same map. Shegolskoe goes from 76% to 36%, Factory from 82% to 36%. Learn a map on Isolated before you take it into Open.
Dalniy Catastrophe
The Soviet island, and where every operative starts. Thirteen of the nineteen raids are here.
Shegolskoe
Your first map: the Monolith's Alpha level hands it to you, and Beta wants an extraction from it. On Isolated 76% of squads got out; on Open, 36%.
The primary task is Active Matter Collection. The Isolated variant selector offers plain Shegolskoe, Shegolskoe: Distortion and Shegolskoe: Overgrowth, or Random. Run it on Isolated until you can reach an extraction point without opening the map.
Raid clear: Shegolskoe · Shegolskoe: Distortion · Shegolskoe: Overgrowth
Factory
The second Beta gate. On Isolated, with Hive selected, 82% of squads got out; on Open, 36%. The Open raid runs on a schedule (closed, back in 8 minutes, when we looked).
The primary task is Take a Photo of the cryptic writings on the wall of a building. Landmarks: Factory #3, Factory #5, the Dormitory and the numbered hangars. The variant selector offers plain Factory or Factory: Hive.
Raid clear: Factory · Factory: Hive
Park
Where the Dalniy story starts: the case "Park: Where It All Began" unlocks at Beta. 82% on Isolated, 52% on Open, and the Open raid is scheduled (closed for 28 minutes when we checked).
The primary task is Get Flowermen Remains, and the operative objectives lean the same way: Combat Practice: Dendroids and Deep Study of Flowermen (Melee). The Greenhouse is the map's one labelled landmark, in the middle of it.
Raid clear: Park
Ozernoe
76% on Isolated, which has the variant selector. The Open raid was running as Ozernoe: Overgrowth at 30%, with an hourglass showing its time left.
The primary task is Place Device: put sensors in a designated area. Landmarks include the Church and the Fire Station, and the Open raid marks a Landing zone: Village.
Raid clear: Ozernoe · Ozernoe: Overgrowth
Scrapyard: Midnight
Open only, and always at night: there is no daytime or Isolated version. 37% extracted. The terminal showed Poor weather and Night, with the Power Station and Hangar #84 as the two labelled landmarks. The primary task is Active Matter Collection.
Raid clear: Scrapyard
Cargo Port
74 to 76% on Isolated across the two times we looked, with the variant selector offering Cargo Port or Cargo Port: Darkness. The primary task is Place and Protect Device, and the additional objective is Harbor Anomaly: Thorough Research. Landmarks: the Power Station and a Barge anomaly on the water.
Raid clear: Cargo Port · Cargo Port: Darkness
Gigastructure
Open only, 50% extracted, and nothing like the other maps: the terminal shows a single yellow zone labelled Gigastructure instead of a street map. Its primary objectives are a research chain: Fragment Acquisition (collect and extract enriched Fragments), then Analysis of Fragments and Further Research, which refine them. The operative objectives include Combat Practice: Mimics.
Raid clear: Gigastructure
Military Base: Silent Observers
The highest Isolated extraction rate we saw: 85%. On Open it's 43%, and scheduled. The primary task is Active Matter Collection, around a flooded quarry with the Main Building, the Power Station and Hangars #148 and #209. There's no variant selector: Silent Observers is its own raid.
On launch day it was already the easy one, at 90%. If you need an extraction for a Monolith gate and any raid will do, start here.
Raid clear: Military Base: Silent Observers
Military Base: Unstable Zone
The same quarry, a different raid. It's Open only, and like every Unstable Zone its primary objective is Survive: "Avoid the collapsing Zone and survive until the extraction portal appears." You outlast the collapse and leave through the portal when it opens. 16% of squads managed it, the lowest Open rate we saw.
It runs on a schedule and was under "Temporarily unavailable raids" when we recorded, back in 26 minutes.
Raid clear: Military Base: Unstable Zone
Dogorsk
36% on Open, which was closed for over an hour when we looked. The primary task is Anomalous Monuments: take a photo of the anomaly on the monument. Landmarks: the Kindergarten, the Police Station and Cinema "Sputnik". Case tasks send you here too, for example eliminating Distorted with bolt-action rifles.
Raid clear: Dogorsk
Escape from Dogorsk
Not a variant of Dogorsk: it's its own raid, Isolated only, and at 11% it had the second-lowest extraction rate we saw, after Downtown: Collapse. It has one primary objective, "Isolated Raid: Escape with Device", and the instruction is exact: extract the device through the portal in the tunnel.
The map shows why the number is so low: it's covered in creature markers, with a single extraction marker on it.
Raid clear: Escape from Dogorsk
Dam
53% on Open, which runs on a long schedule (back in 1 hour 26 minutes when we checked); Isolated is available too. The primary task is Get Turned Soldier Remains, and the creature markers cluster along the dam wall itself, between the Administration building and the Warehouse.
Raid clear: Dam
Epicenter
Listed, not playable. Select it and the deploy button reads "Raid will be available in future updates", and the extraction rate is N/A. We'll update this section when it opens.
Saltriver City Incident
The North American city: one map, Downtown, in three raids.
Downtown
68% on Open. The primary task is Get Distorted Remains, and the additional objective is Getting the Lay of the Land. It's the most labelled map in the game: The Cobble Hill Inn, the Gun Store, the Record Store, the Hardware Store and "Toys for You", with a marked Landing Zone.
Raid clear: Downtown
Downtown: Collapse
Isolated only, and the lowest extraction rate we saw: 3% of squads got out. It isn't a loot run. The primary objectives are Zone Stabilization (protect each beacon, then extract), Activation Zone Clearing (eliminate threats, counted to 250) and Collapse Study (refine the Collapse Study Data you bring back). The only operative objective is Data Collection: the data left behind after a beacon is stabilised.
Raid clear: Downtown: Collapse
Downtown: Unstable Zone
Open only, scheduled, and a Survive raid like the other Unstable Zones: outlast the collapse, leave through the portal. 62% got out, far better than the Military Base version.
Raid clear: Downtown: Unstable Zone
Anguka Anga Quarantine
The African zone. Headquarters and Airport share one map, and each raid's terminal labels the other.
Headquarters
66% on Isolated. The primary task is Get Distorted Remains, and the additional objective is Headquarters Access Code. Landmarks: the North and South Bunkers, the Hotel and the Villa.
Raid clear: Headquarters
Airport
The third Beta gate, and the one that makes you leave Dalniy early. 76% on Isolated, 43% on Open. The primary task is Eliminate Threats, and the additional objective is Cargo Manifest. Landmarks: the Military Camp, Hangars 4A and 8A, and the Warehouses.
Raid clear: Airport
Headquarters: Unstable Zone
Open only, scheduled (live, with under six minutes left, when we recorded), and another Survive raid. 24% extracted.
Raid clear: Headquarters: Unstable Zone
If a raid keeps killing you
The Monolith doesn't care how you got out, only that you did, and a 3% or 11% raid can hold up a case. Every playable raid above has a raid clear: one of our pros joins your squad (or plays it on your account, if you'd rather), and the extraction counts against your operative. How that works, and what it does and doesn't get around in Gaijin's rules, is in Active Matter Boosting Explained. For the rest of the basics, start with the Beginner's Guide.